


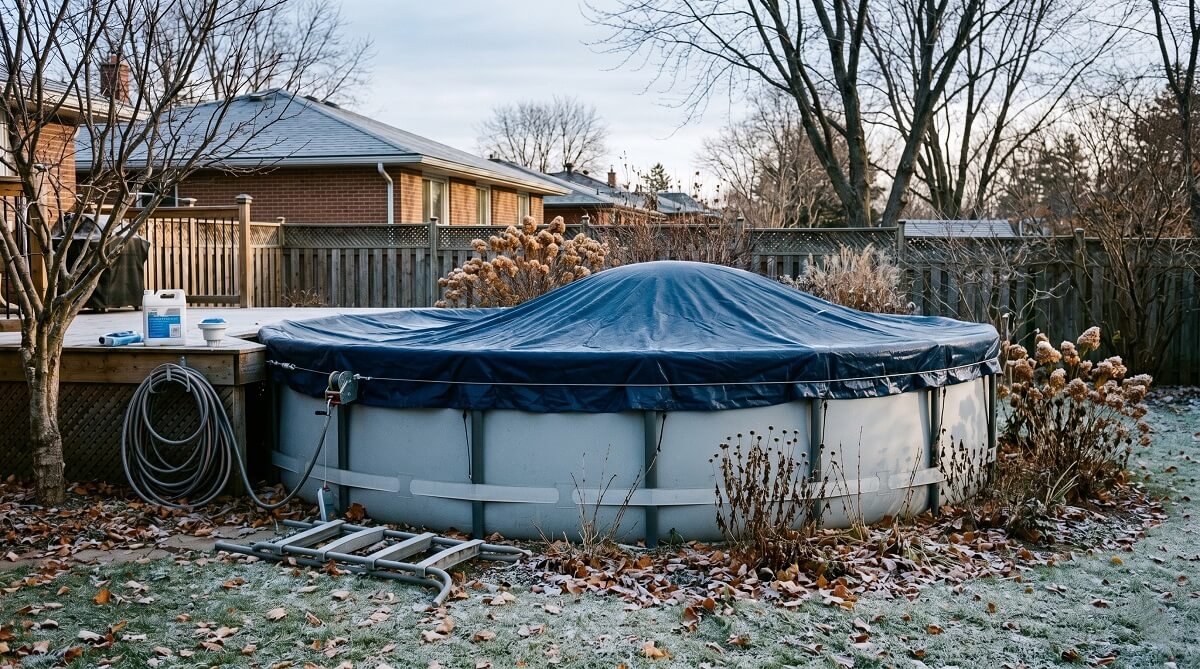
Winterizing an above ground pool isn’t complicated, but skipping steps — or doing them out of order — can leave you with a cracked skimmer, a ruined liner, or a swamp of green water come April. The good news: if you set aside an afternoon, you can have your pool sealed up and protected in under three hours. Chemicals typically run $40–$80 for a 10,000–15,000 gallon pool, and a decent winter cover adds another $60–$150. That’s money well spent compared to replacing a pump ($150–$400) or a liner.
The core tasks are straightforward: balance the water, shock the pool, clear and store the pump and hoses, plug the skimmer and return lines, float an air pillow, and lock down the winter cover. This guide walks through each step with the specific numbers and supply recommendations you need — no guesswork required.
Do You Actually Need to Winterize?
✅ Close your pool if:
- Outdoor temperatures in your area regularly drop below freezing (32°F / 0°C)
- You won’t be using the pool for more than a few weeks
- You’d rather spend one afternoon now than a full weekend cleaning in spring
❌ You can skip full winterization if:
- You live in a year-round warm climate where temps rarely dip below freezing
- You plan to keep the pool running through winter with regular chemical maintenance
For most of the US — anywhere that sees frost or snow — shutting down for the season is the right call. Freeze damage to a skimmer or pump can run hundreds of dollars in repairs. The closing process costs a fraction of that.
When to Close Your Above Ground Pool
Timing matters more than most people realize. Button up too early — while the weather is still warm — and you risk algae blooming under the cover all winter. Wait too long and you’re racing a freeze that can crack your skimmer before you finish.
The sweet spot: hold off until outdoor temperatures consistently stay below 65°F (18°C) before closing. At that point, algae growth slows significantly, and you have a comfortable window to do the work without rushing. For most pool owners in the northern US, that’s mid-September through mid-October, per SwimUniversity.
If a surprise cold snap hits before you’re ready, prioritize disconnecting and storing the pump — it’s the component most vulnerable to freeze damage. Everything else can wait a day or two.
What You’ll Need
Chemicals
- Pool shock (calcium hypochlorite or non-chlorine shock) — follow the label for your pool’s gallon capacity
- Winter algaecide — copper-free formula recommended
- pH increaser or decreaser — to hit target range before closing
- Alkalinity increaser (sodium bicarbonate) — if your water tests low
- Calcium hardness increaser — if your water tests soft
- Optional: an all-in-one winter closing kit (typically $30–$60) that bundles shock, algaecide, and stain preventer in one package — check current prices on Amazon
Equipment
- Pool skimmer net, vacuum, and brush
- Water test kit or test strips
- Skimmer winterizing plate (Aquador standard: ~$28–$30; wide-mouth: ~$29–$37) — or plan to lower the water level instead
- Return line plug (usually 1.5″ threaded) to replace the eyeball/return jet
- Air pillow — 4×4 ft for round pools up to 18 ft; 4×8 ft for round pools up to 33 ft
- Winter pool cover — sized 3–4 ft larger in diameter than your pool (e.g., 28 ft cover for a 24 ft pool)
- Cover cable and winch (usually included with the cover)
- Cover pump (submersible) — to remove standing water from on top of the cover during winter
The 8 Steps to Winterize Your Above Ground Pool
Step 1: Test and Balance Your Water Chemistry
Before you add anything or touch any equipment, test your pool water. You need to know where you stand on four key measurements — and adjust if needed — while the pump is still running to circulate the chemicals properly.
Target ranges for closing (per SwimUniversity and InTheSwim):
| Parameter | Target Range | Closing Goal |
|---|---|---|
| pH | 7.4–7.6 | Aim for the high end (7.6) |
| Total Alkalinity | 100–150 ppm | Aim for 125–150 ppm |
| Calcium Hardness | 175–225 ppm | Aim for 200+ ppm |
| Free Chlorine | 1–3 ppm | At least 1 ppm going in |
Why aim for the upper end? Chemical levels drift down naturally over a closed winter — starting a bit high gives you a safety buffer. Always adjust alkalinity before pH. And let the pump run a few hours to circulate any adjustments before moving on to the next step.
Step 2: Clean the Pool Thoroughly
Skim the surface, vacuum the bottom, and scrub the walls and floor. Clear everything out — leaves, sediment, any visible algae clinging to the liner. Pull out the ladder, steps, pool lights, and any accessories you won’t need until spring.
Organic matter left in a closed pool feeds algae and mold over the months ahead. Metal hardware corrodes if left submerged — and corroded metal stains liners and contaminates water. Tuck everything away in a dry spot out of direct sunlight.
Step 3: Shock the Pool and Add Winter Chemicals
Add pool shock according to the product label — dosage varies by formulation and pool size, so don’t guess. Run the pump for at least two hours after adding shock to distribute it throughout the water.
Once chlorine levels drop back below 5 ppm (usually 24–48 hours later), add your winter algaecide. Adding algaecide too early — while chlorine is still spiked from the shock — neutralizes it before it can work.
If you opt for an all-in-one winter closing kit, follow the kit’s specific instructions — some let you skip a few of these sub-steps. A kit typically runs $30–$60 for pools up to 15,000 gallons; check current prices on Amazon.
Step 4: Winterize the Pump and Filter
Here’s where most first-timers make a costly mistake: leaving the pump outside. Pump seals freeze and fail — a replacement runs $150–$400. Bring it indoors every year, no exceptions.
Here’s how to clear the system:
- Disconnect all hoses from the pump, skimmer, and filter
- Let water drain fully from each hose; allow them to dry before putting them away
- Remove drain plugs from the pump and filter — store them inside the pump basket so you’ll find them in spring
- Pull the pump and stow it indoors
By filter type:
- Sand filter: Set the multiport valve to “Winter” or “Closed.” Open the drain plug at the bottom to let it drain completely. The filter tank can stay outside as long as the drain plug is removed — water has nowhere to pool and freeze.
- Cartridge filter: Remove and rinse the cartridge; keep it indoors. Leave the filter drain open.
- D.E. filter: Drain, rinse the grids with a hose, and leave all valves open.
If you have a saltwater pool, switch the chlorine generator to the “winter” setting if it has one. Otherwise, remove the electrolytic cell, clean it, and tuck it inside for the off-season.
Step 5: Plug the Skimmer and Return Lines
Water sitting in an unprotected skimmer freezes, expands, and cracks the housing — a repair that runs $100–$300 or more. The same principle applies to the return line.
Two options for protecting the skimmer:
- Option A — Skimmer plate: Install an Aquador winterizing plate (~$28–$37 depending on skimmer size). It snaps into place and seals water out — no draining required. Cleaner, faster, and worth the cost.
- Option B — Drain the pool: Lower the water 4–6 inches below the skimmer line. More work, but achieves the same protection without the plate.
For the return line: pull out the eyeball jet and thread in a 1.5-inch winterizing plug. Hand-tight is sufficient.
Step 6: Lower the Water Level (If Not Using a Skimmer Plate)
Installed a skimmer plate in Step 5? Skip ahead — the plate handles protection and you can leave the pool at its normal level.
Going without a plate? Drain the water 4–6 inches below the return line using your filter’s backwash mode, a submersible pump, or a siphon hose.
Never drain an above ground pool completely. The vinyl liner dries out, shrinks, and cracks when exposed to air for extended periods. Even in winter, the water keeps the liner supported and pliable.
Step 7: Float the Air Pillow
If you live somewhere that freezes, an air pillow is non-negotiable. When the water surface ices over, that ice wants to expand outward — pushing against your pool walls. A pillow sitting in the center gives the ice somewhere to push inward instead, protecting the walls and liner.
Inflate it to 50–60% capacity — not fully firm. That partial inflation lets the pillow compress when ice forms without popping. Once inflated, seal the valve with a strip of duct tape to slow air loss over winter.
Sizing guide (per Leslie’s Pool Supplies and Doheny’s):
- Round pools up to 18 ft: 4×4 ft pillow
- Round pools up to 33 ft: 4×8 ft pillow
- Oval pools (all sizes): 4.5×15 ft pillow
Place it in the center of the pool and run a thin rope from one wall to the other to keep it there through wind and storms. Many pillows have grommets that make this straightforward.
Step 8: Install the Winter Cover
Pick a cover 3–4 feet larger in diameter than your pool — a 24-ft pool needs a 27 or 28-ft cover. That extra material wraps under the cable to anchor the cover; pull it too tight over a correctly-sized pool and it won’t last the winter.
Installation:
- Drape the cover over the pool and air pillow
- Thread the cable through the grommets around the perimeter
- Tighten with the winch until snug — not drum-tight
- Clip cover clips to the top rail for extra wind resistance
If your pool has a walk-around deck, use water bags (not bricks — they can puncture the cover) along the perimeter for added security.
Winterizing by Filter Type: Quick Reference
| Filter Type | Key Steps | Store Inside? | Special Notes |
|---|---|---|---|
| Sand | Set valve to Winter/Closed; open drain plug; remove pump | Pump: YES. Filter: can stay outside with drain open | Avoid moving the sand filter — shifting it can damage the lateral assembly |
| Cartridge | Remove & rinse cartridge; leave drain open | Cartridge: YES. Filter body: can stay outside | Keep cartridge away from mice and pests in storage |
| D.E. (Diatomaceous Earth) | Drain; rinse grids with hose; leave valves open | Pump: YES. Filter: can stay outside with valves open | Dispose of spent D.E. properly before storage |
What to Do While Your Pool Is Closed
Putting the cover on isn’t the last step — especially if you get heavy snow or rain. A bit of attention through the off-season prevents bigger problems at opening.
- Sweep off heavy snow: Use a soft pool brush to clear accumulation. Too much weight compresses the air pillow and strains the cover. Shovels can punch holes in the cover material.
- Pump off standing water: Pull out the submersible cover pump when water on top of the cover reaches about 2 inches deep. Pooling water is heavy, wears out the cover, and can drag it into the pool.
- Inspect the cover monthly: Check for shifting, small tears, or a loosening cable. A 10-minute fix in December beats a full cover replacement in March.
- Stay on top of spring snowmelt: Melt runoff builds up fast on the cover. Keep pumping it off so the weight doesn’t bow your pool wall before you’re ready to open.
Frequently Asked Questions
Do I have to drain my above ground pool for winter?
No — and you shouldn’t. Fully draining an above ground pool lets the vinyl liner dry out, shrink, and crack. Either lower the water 4–6 inches below the skimmer line (if you’re not using a skimmer plate) or leave it at normal level with a skimmer winterizing plate installed. The water keeps the liner supported and flexible through the cold months.
When is the right time to winterize my above ground pool?
When outdoor temperatures consistently fall below 65°F (18°C). For most of the US, that’s mid-September to mid-October. Sealing up too early — while it’s still warm out — invites algae growth under the cover. Going too late risks a freeze catching your equipment before you can protect it.
How much does it cost to winterize an above ground pool?
Chemicals alone — shock, algaecide, and balancers — run roughly $40–$80 for a 10,000–15,000 gallon pool. An all-in-one winter closing kit is typically $30–$60. Add a winter cover ($60–$150 for a 24-ft pool), an air pillow ($15–$30), and a cover pump ($30–$60) if you don’t already own one. Budget $150–$300 total for the first year; after that, it’s mostly just the chemicals.
Do I need a pool air pillow?
Yes, if your area sees freezing temperatures. When water turns to ice, it expands outward — that pressure can bow or crack pool walls. An air pillow redirects that expansion inward toward the center of the pool instead of outward against the structure. It also pushes water on the cover toward the edges, making spring cleanup easier.
Can I leave my pump and filter outside for winter?
The pump should always come indoors — frozen pump seals fail, and replacements run $150–$400. A sand filter can stay outside as long as all drain plugs are removed (no standing water means nothing to freeze and crack the tank). Cartridge filter elements need to be stored inside.
What water chemistry levels do I need before closing?
Aim for pH 7.4–7.6, total alkalinity 100–150 ppm (shoot for 125–150), calcium hardness 175–225 ppm, and free chlorine 1–3 ppm. Target the upper end of each range — levels drop naturally over a closed winter, so starting a bit high gives you a built-in cushion.
What size winter cover do I need?
Order a cover 3–4 feet larger in diameter than your pool. A 24-ft round pool takes a 27–28 ft cover. A 15×30 ft oval pool needs an 18×33 ft cover. That extra material is what wraps under the cable-and-winch system to hold the cover securely — a cover that’s sized exactly to your pool can’t be properly anchored.
What’s in a pool winterizing kit — and is it worth it?
Most kits include pool shock (often non-chlorine), winter algaecide, and a stain or scale preventer. Some also throw in a clarifying enzyme treatment. For pools under 15,000 gallons, a kit is a convenient option and often prices out close to buying the chemicals separately. Larger pools may save money buying chemicals individually — just check the label dosages for your volume.
Ready to Button Up for Winter?
Pick an afternoon before the first hard freeze, gather your supplies, and work through the steps in order. Do it right and spring opening is a two-hour job instead of a two-day cleanup. Check current prices on closing kits, air pillows, and covers on Amazon, or swing by a local pool supply store for same-day pickup.
